 Slammed '55 Bel AirWithin hours of getting my hands on the Model Motoring '55 Chevy Bel Air, I had it disassembled and in close contact with my Dremel. I brought it to a race the next day, but chose to go with another car. I like to race different bodies, which is why I chose this one, but I get the feeling that this may become a fairly widely used race body.
|
||||||||||||||||||||||
 
|
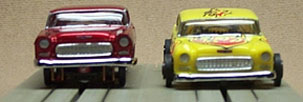
| This
is my first attempt at slamming the Model
Motoring '55 Chevy Bel Air. As you can see there is room to
lower this bad boy. The yellow is my modified car, the candy red
is totally stock, and used for comparison.
|
 
|
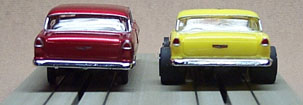
| As
you might guess just by looking at the body, there is not much room to
lower the rear of the Bel Air. I took quite a bit of material out
from the under side of the trunk, as well as the bottom of the rear glass.
The front lowers much easier, and I didn't shave off much plastic
there because I wanted to keep weight over the guide pin. With lower
front tires (which I have not yet installed) the car would be lower in
the front. Even with the taller tires in the rear, my modifed car
is barely higher than the stock. To get that lower, I simply need
to press on a set of Thunder Rubbers (which I also have, but haven't installed).
|
 
|
| There's
a bit of an optical illusion here (not the tilt, they're actually like
that). Although the bodies are the same width, the wider tire setup
on the yellow car actually makes the bady look wider. You can see
how low the front is to the rails at this angle. Just imagine much
closer I could get it if I replace the .350 front tires with .330's!
|

|
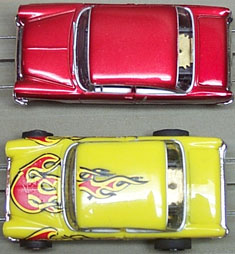
| From
the top... I added flames to add to the "curb appeal" of this
car. The decals are from Pine Car dry transfer decals ("Stripes
and Flames" set, courtesy of my "Track Manager", this Christmas).
A coat of Testors clear gloss coat is on top of it.
|
| *
Home * Visitors to this page since January 2001 Don't make us kick your ass. All graphics and content © 2000-2001 Mr. Bigstuff |